Migrating/cloning an Apple MAC OSX with Windows 7 / 8 / 10 Bootcamp partition to another hard or solid state (HDD / SSD) disk drive (Updated March 2018)
I got a Mac Book Pro 13" in 2012 that in 2016 I upgraded to a 240GB SSD from a similar sized 250GB HDD. Since then I have followed this procedure a number of time for friends and customers. This week I again had to upgrade that same Mac Book Pro from the 240GB SSD to a new 480GB SSD and again came across a number of problems. For this reason, I have decided to invest my time in documenting this troublesome process for the benefit of others and so next time I have to do it I won't have to remember and re-discover everything again.
TL;DR - The Crux of this article is that unfortunately, there is no easy way to just copy the whole old drive, with the different Mac and Windows Bootcamp partitions to a new drive. However, with this guide, the complex process is fully explained and broken up into five manageable and easy to understand processes along with their individual steps to do so.
NOTE: I use the word 'drive' loosely here but these processes could work to/or from either an SSD or HDD. If you are replacing an HDD with another HDD I suggest you stop and get an SSD as the speed benefits are very significant and can make an old Mac feel like a new computer. They are much cheaper today than they were even a year ago.
To undertake this process for FREE then you need to follow these broad process steps.
There are five broad processes that need to be taken:
A. Clone the Mac OSX Partition from the old drive to the new drive.
B. Re-create the Recovery Partition on the new drive.
C. Make sure New Mac OSX works, then recreate a BOOTCAMP partition on the new drive.
D. Clone the Old Windows OS to the newly created BOOTCAMP Windows partition.
E. Fix the new copy of the Windows Partition so that it boots properly.
PAID SOLUTIONS (If you know of others please comment with a link):
1. Use WinClone which is an Apple and Bootcamp aware disk cloning utility https://twocanoes.com/products/mac/winclone-2/
Winclone Support Document: Migrating a Bootcamp Partition with Winclone
Winclone Support Document: Move Boot Camp to a replacement drive
This will cost you at least $20 USD and will not really make the process much easier. It just helps with the Process D as listed above.
2.UPDATE March 2018:
a) I found a new reasonably priced tool (~$20USD) from Paragon called CampTune that allows only for the resizing of the MacOS and Bootcamp Windows partitions. Which I have now had the pleasure of using and it is SO EASY and RECOMMENDED! https://www.paragon-software.com/home/camptune/
An alternative approach to achieving a similar outcome to BootCamp but without all the later issues of BootCamp's dual-disk partition configuration method can be found here:
https://www.reddit.com/r/mac/comments/2fy3be/by_popular_demand_my_better_than_bootcamp_guide/
Unfortunately, this option is a complex alternative approach and only really available to experienced technically capable IT people. Please only choose to take that alternative path at your own peril.
PLEASE NOTE: This documentation has been created with images from several episodes of this process and therefore inconsistencies in images exist that may potentially confuse readers. I do apologise for these inconsistencies however, this process is complex and stateful i.e. some functions can only be displayed under specific situations and are thus very hard to document after the fact.
======================================
Software Preparation
1. Install a trial version of Carbon Copy Cloner or SuperDuper! on your Mac OSX in preparation.
2. If you are moving from a larger HDD to a smaller SSD then make sure you shrink the partitions either with these tools or with the Mac Applications\Utilities\Disk Utility to a size smaller than the SSD partitions you wish to migrate to.
http://osxdaily.com/2009/11/20/resize-partitions-in-mac-os-x-with-disk-utility/
You may need to do this also with a Windows utility also:
https://www.howtogeek.com/howto/windows-vista/resize-a-partition-for-free-in-windows-vista/
Hardware Preparation
The physical preparation can follow two distinct paths that result in very different time to execute and trades off skills/equipment with time to execute. These two paths are listed as Path 1 and Path 2 below. Note: If you have a newer Mac with USB 3.0 ports then it is probably easier to follow Path 2 and the fact that you have USB 3.0 will make it both much faster and simpler.
PATH 1: FOR THE MORE ADVANCED USERS
Time Required*: 30 Min to 4 Hrs
Path 1: More technical and requires equipment but is the fastest to execute.
3. Remove your optical drive from the iMac or MacBook. Search Google for a guide to help you (also please don't ask me questions about hardware steps).


4. Replace the optical drive with the new SSD/HDD in an optical to HDD drive caddy (search eBay or AliExpress). This is done to maximise throughput and significantly reduce the time taken, depending on drive size from nearly a full day, down to 20 min. (SSD to SSD) to 4 hours (to or from a large HDD). This allows the SATA drive to run at 1.5,3 or 6 Gbps speed which is much faster than USB 2 (speeds can be seen in a below picture of the SATA drive info).


Note: If I am working on a MacBook (Pro) I usually move the old drive to the optical drive caddy and replace the old drive with the new drive while I have the case open first up. But this is not important, but just a matter of process and time optimisation. In an iMac going from a large 3.5 HDD to a smaller 2.5 SSD it is not possible to do it this way and you must put the smaller drive in the optical drive caddy. However, in the iMac case, I use an external monitor so I can perform the process without having to open re-assemble the screen then re-open it back up etc. WARNING: If you do this be careful as it is easy to give yourself a dangerous electric shock in some models as the mains power supply can be easily exposed on the power supply board.


ADVANCED USER TIP: For the more technically advanced IT professionals: In desperation and without the internal optical drive to HDD caddy available, I have successfully hacked a normal SATA cable to plug into the Mac optical drive connector. With a sharp knife, you can cut the housing side (non-contacts side) off the female SATA connector and turn it into a male connector that can be inserted into the optical drive data side of the connector (refer to picture below). I then use duct tape to hold it together and more importantly in-place. Then you also need an external power supply to power the SATA drive (an old PC power supply works). It is messy but works easy enough if you don't have a laptop drive caddy handy. See picture below:

OR PATH 2: FOR THE LESS TECHNICAL
Time Required*: 10 to 20 Hrs
Path 2: A less technical approach which requires not much equipment but is much much slower to execute the disk cloning.
This alternative leaves the internal optical in place. But this will be much slower due to the 480 Mbps limit of USB 2.0. Whereas the Path 1 internal SATA drives will run at 1.5,3 or 6 Gbps.
NOTE: If you are lucky enough to have a newer Mac with USB3.0/3.1 then you a going to be at least 10 times faster than USB2.0 anyway. Thus the time required will be similar to that in Path 1.
3. Plug-in your USB (2 or 3) to 2.5" SATA adapter


4. Plug in the new SSD/HDD into that.
PATH 1 & PATH 2 - Both paths merge again here...
5. Make sure any battery is fully charged (if a portable device) and the Mac is connected to power supply (i.e. a charger for a portable device).
6. Run the Mac Applications\Utilities\Disk Utility to initialize the new SSD/HDD. Usually, the MAC OS will warn you to do so, with a dialogue box.

8. Now run SuperDuper! or Carbon Copy Cloner to copy the 'Macintosh Old' to new partition 'Macintosh New'. WARNING Make sure you name or rename the drives (really Mac 'drives' are partitions) so that they can be identified without error.
Cloning the Mac OSX partition using Carbon Copy Cloner:

Cloning the Mac OSX partition using SuperDuper!:


9. Either set the startup disk to 'Macintosh New' then Reboot to the newly copied Mac partition. Or optionally you can just hold the option key at reboot and select the newly cloned Mac OS drive to boot from.
*Note "Time Required" depends on the choice of Path 1 or 2 and also on the use of SSD/HDD and on the size of the drives being used and the data being cloned.
Links related to this process
You can of course also use a Thunderbolt to eSATA and/or USB 3.0 Adapter that can also speed this process up.
Apple Store: https://www.apple.com/shop/product/HGC82ZM/A/kanex-thunderbolt-to-esata-usb-30-adapter
Others here:
https://www.startech.com/au/Networking-IO/Adapter-Cards/thunderbolt-to-gigabit-ethernet-usb-3~TB2USB3GE
https://www.startech.com/au/Cards-Adapters/HDD-Controllers/SATA-Cards/thunderbolt-esata-usb-3-adapter~TB2USB3ES
These devices are expensive and should usually not be bought just for this task, but for the purpose of ongoing use, to speed up USB access on an older Mac for example. Or perhaps for IT technicians wanting to speed up the process on multiple Mac's over time. If anyone has specific experience with these adapters please post a comment.
======================================
WARNING! IF YOU DON'T DO THIS STEP NOW BEFORE YOU CREATE A NEW BOOTCAMP PARTITION THEN YOU WILL HAVE PROBLEMS LATER!
If you used Carbon Copy Cloner it may have already created a new Recovery partition.
Refer: https://bombich.com/kb/ccc4/cloning-apples-recovery-hd-partition
If you used SuperDuper! or you just want to make sure (recommended) then follow this:
1. You will need a copy of the Mac OSX install files (.APP, .ISO or .DMG) from which to extract the recovery partition. You can download one from Apple here.
Specific OS links here:
Download macOS Sierra 10.12.5 Combo Update
Download OS X El Capitan 10.11.6 Combo Update
NOTE: If you are about to update the OS (THIS IS A GOOD TIME) then choose the newer image.
2. Download "Recovery Partition Creator" utility from the list of utilities on this page here:
http://musings.silvertooth.us/downloads-2/
3. Disable the security settings in System Preferences if you need to:
4. Run the Recovery Partition Creator and point it at the OSX image file you downloaded. When you get to the scan option, make sure you do run the scan option (DO NOT SKIP) as I have noticed the utility does not work sometimes if you do not.
5. Reboot the Mac and select the NEW Mac OSX. NOTE: Confirmation of the new Recovery Partition is achieved when (should) notice the new recovery partition (or at least two of them) when you reboot and hold the option key to select from the boot drives available. Select the NEW Mac OSX or if you want you could first test the Recovery Partition works.

Links related to this process
NOTE: Read this for further guidance or for troubleshooting:
http://www.macworld.com/article/2602951/mac-gems-recovery-partition-creator-adds-os-x-recovery-to-any-drive.html
Create Your Own OS X Recovery HD on Any Drive - Debug - Show every partition
Carbon Copy Cloner - Cloning Apple's Recovery HD partition
https://www.linkedin.com/pulse/how-re-create-missing-recovery-partition-os-x-mattia
Mac Gems: Recovery Partition Creator adds OS X Recovery to any drive
======================================
and then you will have to run the Bootcamp Assistant to re-partition the hard drive for Windows.
You probably already have a Windows DVD install disk and know about this requirement having already installed (I assume) a Windows Bootcamp partition before. However if you have lost it or forgotten what you are doing you can always refer here for details on which Mac models that Bootcamp will work with which specific Windows versions: https://support.apple.com/en-au/HT204048.
1. Reboot the Mac and select the NEW Mac OSX.
2. NOTE: If you took Procedure A - Path 1 then you will need to plug in an external USB DVD drive. Otherwise, insert your Windows 7/8 install disk (a required step to allow Bootcamp to run).

3. Get your Windows DVD install disk and the DVD drive (if required) that matches one of the Windows OS version that Bootcamp expects to use to install the new Windows partition. If you don't have a suitable Windows DVD disk, you can download an ISO from here http://windowsiso.net/ or Microsoft, and you will need to burn it to a blank DVD disk if you don't already have one. Note: In most cases only a 64-bit edition of Windows is supported.
If you are using an older Mac OSX version than 10.10 Yosemite and/or an older version of Bootcamp then there are no easy ways to avoid this annoying step of creating of a Windows DVD and it is a limitation of earlier versions pf Bootcamp. I do mention later one way I get around this issue, unfortunately it requires a special $99 USD device called an ISOSTICK (refer isostick.com).
However, if you have upgraded to later versions (10.10/11/12+) of Mac OSX (this may be a good time to do so), then you may be able to optionally use a USB drive with the Windows image on it. Bootcamp will even off to create the USB boot stick from an ISO file.

4. Run the Mac Applications\Utilities\Bootcamp utility to setup the new Windows partition and begin the install. Since you are migrating rather than installing Windows you can deselect the first option to download drivers.
TL;DR - The Crux of this article is that unfortunately, there is no easy way to just copy the whole old drive, with the different Mac and Windows Bootcamp partitions to a new drive. However, with this guide, the complex process is fully explained and broken up into five manageable and easy to understand processes along with their individual steps to do so.
NOTE: I use the word 'drive' loosely here but these processes could work to/or from either an SSD or HDD. If you are replacing an HDD with another HDD I suggest you stop and get an SSD as the speed benefits are very significant and can make an old Mac feel like a new computer. They are much cheaper today than they were even a year ago.
To undertake this process for FREE then you need to follow these broad process steps.
A. Clone the Mac OSX Partition from the old drive to the new drive.
B. Re-create the Recovery Partition on the new drive.
C. Make sure New Mac OSX works, then recreate a BOOTCAMP partition on the new drive.
D. Clone the Old Windows OS to the newly created BOOTCAMP Windows partition.
E. Fix the new copy of the Windows Partition so that it boots properly.
PAID SOLUTIONS (If you know of others please comment with a link):
1. Use WinClone which is an Apple and Bootcamp aware disk cloning utility https://twocanoes.com/products/mac/winclone-2/
Winclone Support Document: Migrating a Bootcamp Partition with Winclone
Winclone Support Document: Move Boot Camp to a replacement drive
This will cost you at least $20 USD and will not really make the process much easier. It just helps with the Process D as listed above.
2.UPDATE March 2018:
a) I found a new reasonably priced tool (~$20USD) from Paragon called CampTune that allows only for the resizing of the MacOS and Bootcamp Windows partitions. Which I have now had the pleasure of using and it is SO EASY and RECOMMENDED! https://www.paragon-software.com/home/camptune/
b) Or try their fully featured Paragon Mac Hard Drive/Partition Manager utility (for $40USD)
https://www.paragon-software.com/home/hdm-mac/features.html. Which finally looks like it will make this entire task finally readily achievable by those with more limited technical skills.
NOTE: If you do go the paid software route there are still concepts and hardware procedural assistance available in this article so please read on.
An alternative approach to achieving a similar outcome to BootCamp but without all the later issues of BootCamp's dual-disk partition configuration method can be found here:
https://www.reddit.com/r/mac/comments/2fy3be/by_popular_demand_my_better_than_bootcamp_guide/
Unfortunately, this option is a complex alternative approach and only really available to experienced technically capable IT people. Please only choose to take that alternative path at your own peril.
PLEASE NOTE: This documentation has been created with images from several episodes of this process and therefore inconsistencies in images exist that may potentially confuse readers. I do apologise for these inconsistencies however, this process is complex and stateful i.e. some functions can only be displayed under specific situations and are thus very hard to document after the fact.
======================================
A: Clone the Mac OSX Partition from the old drive to the new drive
I recommend using Carbon Copy Cloner or SuperDuper! to clone your Macintosh partition. Once that's completed on the new hard drive, you may have to re-create the Recovery drive (B).Software Preparation
1. Install a trial version of Carbon Copy Cloner or SuperDuper! on your Mac OSX in preparation.
2. If you are moving from a larger HDD to a smaller SSD then make sure you shrink the partitions either with these tools or with the Mac Applications\Utilities\Disk Utility to a size smaller than the SSD partitions you wish to migrate to.
http://osxdaily.com/2009/11/20/resize-partitions-in-mac-os-x-with-disk-utility/
You may need to do this also with a Windows utility also:
https://www.howtogeek.com/howto/windows-vista/resize-a-partition-for-free-in-windows-vista/
Hardware Preparation
The physical preparation can follow two distinct paths that result in very different time to execute and trades off skills/equipment with time to execute. These two paths are listed as Path 1 and Path 2 below. Note: If you have a newer Mac with USB 3.0 ports then it is probably easier to follow Path 2 and the fact that you have USB 3.0 will make it both much faster and simpler.
PATH 1: FOR THE MORE ADVANCED USERS
Time Required*: 30 Min to 4 Hrs
Path 1: More technical and requires equipment but is the fastest to execute.
3. Remove your optical drive from the iMac or MacBook. Search Google for a guide to help you (also please don't ask me questions about hardware steps).


4. Replace the optical drive with the new SSD/HDD in an optical to HDD drive caddy (search eBay or AliExpress). This is done to maximise throughput and significantly reduce the time taken, depending on drive size from nearly a full day, down to 20 min. (SSD to SSD) to 4 hours (to or from a large HDD). This allows the SATA drive to run at 1.5,3 or 6 Gbps speed which is much faster than USB 2 (speeds can be seen in a below picture of the SATA drive info).


ADVANCED USER TIP: For the more technically advanced IT professionals: In desperation and without the internal optical drive to HDD caddy available, I have successfully hacked a normal SATA cable to plug into the Mac optical drive connector. With a sharp knife, you can cut the housing side (non-contacts side) off the female SATA connector and turn it into a male connector that can be inserted into the optical drive data side of the connector (refer to picture below). I then use duct tape to hold it together and more importantly in-place. Then you also need an external power supply to power the SATA drive (an old PC power supply works). It is messy but works easy enough if you don't have a laptop drive caddy handy. See picture below:

OR PATH 2: FOR THE LESS TECHNICAL
Time Required*: 10 to 20 Hrs
Path 2: A less technical approach which requires not much equipment but is much much slower to execute the disk cloning.
This alternative leaves the internal optical in place. But this will be much slower due to the 480 Mbps limit of USB 2.0. Whereas the Path 1 internal SATA drives will run at 1.5,3 or 6 Gbps.
NOTE: If you are lucky enough to have a newer Mac with USB3.0/3.1 then you a going to be at least 10 times faster than USB2.0 anyway. Thus the time required will be similar to that in Path 1.
3. Plug-in your USB (2 or 3) to 2.5" SATA adapter


4. Plug in the new SSD/HDD into that.
PATH 1 & PATH 2 - Both paths merge again here...
5. Make sure any battery is fully charged (if a portable device) and the Mac is connected to power supply (i.e. a charger for a portable device).
6. Run the Mac Applications\Utilities\Disk Utility to initialize the new SSD/HDD. Usually, the MAC OS will warn you to do so, with a dialogue box.

7. Now run the Mac Applications\Utilities\Disk Utility to erase the entire new disk. Be careful to choose the correct disk. Label the new disk with a label like "Macintosh New", "Macintosh HDD New" or "Macintosh SSD New". Something that can easily distinguish it from the original Mac disk.
Cloning the Mac OSX partition using Carbon Copy Cloner:

Cloning the Mac OSX partition using SuperDuper!:


9. Either set the startup disk to 'Macintosh New' then Reboot to the newly copied Mac partition. Or optionally you can just hold the option key at reboot and select the newly cloned Mac OS drive to boot from.
*Note "Time Required" depends on the choice of Path 1 or 2 and also on the use of SSD/HDD and on the size of the drives being used and the data being cloned.
Links related to this process
You can of course also use a Thunderbolt to eSATA and/or USB 3.0 Adapter that can also speed this process up.
Apple Store: https://www.apple.com/shop/product/HGC82ZM/A/kanex-thunderbolt-to-esata-usb-30-adapter
Others here:
https://www.startech.com/au/Networking-IO/Adapter-Cards/thunderbolt-to-gigabit-ethernet-usb-3~TB2USB3GE
https://www.startech.com/au/Cards-Adapters/HDD-Controllers/SATA-Cards/thunderbolt-esata-usb-3-adapter~TB2USB3ES
These devices are expensive and should usually not be bought just for this task, but for the purpose of ongoing use, to speed up USB access on an older Mac for example. Or perhaps for IT technicians wanting to speed up the process on multiple Mac's over time. If anyone has specific experience with these adapters please post a comment.
======================================
B. Re-create the Recovery Partition on the new drive.
WARNING! IF YOU DON'T DO THIS STEP NOW BEFORE YOU CREATE A NEW BOOTCAMP PARTITION THEN YOU WILL HAVE PROBLEMS LATER!
Refer: https://bombich.com/kb/ccc4/cloning-apples-recovery-hd-partition
If you used SuperDuper! or you just want to make sure (recommended) then follow this:
1. You will need a copy of the Mac OSX install files (.APP, .ISO or .DMG) from which to extract the recovery partition. You can download one from Apple here.
Specific OS links here:
Download macOS Sierra 10.12.5 Combo Update
Download OS X El Capitan 10.11.6 Combo Update
NOTE: If you are about to update the OS (THIS IS A GOOD TIME) then choose the newer image.
2. Download "Recovery Partition Creator" utility from the list of utilities on this page here:
http://musings.silvertooth.us/downloads-2/
3. Disable the security settings in System Preferences if you need to:
- By default, Apple has changed the security settings to only allow installation of apps from the Mac App Store and identified developers.
- To temporarily get around the error message, control-click the application and choose Open. Click the Open button in the warning dialogue that appears.
- To change this permanently go to System Preferences > Security & Privacy. On the General Tab click the little lock in the lower left corner to unlock the General preference pane. Then select the Anywhere radio button beneath Allow applications downloaded from.
4. Run the Recovery Partition Creator and point it at the OSX image file you downloaded. When you get to the scan option, make sure you do run the scan option (DO NOT SKIP) as I have noticed the utility does not work sometimes if you do not.
5. Reboot the Mac and select the NEW Mac OSX. NOTE: Confirmation of the new Recovery Partition is achieved when (should) notice the new recovery partition (or at least two of them) when you reboot and hold the option key to select from the boot drives available. Select the NEW Mac OSX or if you want you could first test the Recovery Partition works.

Links related to this process
NOTE: Read this for further guidance or for troubleshooting:
http://www.macworld.com/article/2602951/mac-gems-recovery-partition-creator-adds-os-x-recovery-to-any-drive.html
Create Your Own OS X Recovery HD on Any Drive - Debug - Show every partition
Carbon Copy Cloner - Cloning Apple's Recovery HD partition
https://www.linkedin.com/pulse/how-re-create-missing-recovery-partition-os-x-mattia
Mac Gems: Recovery Partition Creator adds OS X Recovery to any drive
======================================
C. Make sure New Mac OSX works, then recreate a BOOTCAMP partition on the new drive
and then you will have to run the Bootcamp Assistant to re-partition the hard drive for Windows.You probably already have a Windows DVD install disk and know about this requirement having already installed (I assume) a Windows Bootcamp partition before. However if you have lost it or forgotten what you are doing you can always refer here for details on which Mac models that Bootcamp will work with which specific Windows versions: https://support.apple.com/en-au/HT204048.
1. Reboot the Mac and select the NEW Mac OSX.
2. NOTE: If you took Procedure A - Path 1 then you will need to plug in an external USB DVD drive. Otherwise, insert your Windows 7/8 install disk (a required step to allow Bootcamp to run).

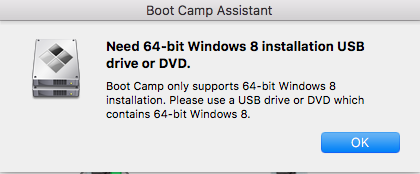
3. Get your Windows DVD install disk and the DVD drive (if required) that matches one of the Windows OS version that Bootcamp expects to use to install the new Windows partition. If you don't have a suitable Windows DVD disk, you can download an ISO from here http://windowsiso.net/ or Microsoft, and you will need to burn it to a blank DVD disk if you don't already have one. Note: In most cases only a 64-bit edition of Windows is supported.
If you are using an older Mac OSX version than 10.10 Yosemite and/or an older version of Bootcamp then there are no easy ways to avoid this annoying step of creating of a Windows DVD and it is a limitation of earlier versions pf Bootcamp. I do mention later one way I get around this issue, unfortunately it requires a special $99 USD device called an ISOSTICK (refer isostick.com).
However, if you have upgraded to later versions (10.10/11/12+) of Mac OSX (this may be a good time to do so), then you may be able to optionally use a USB drive with the Windows image on it. Bootcamp will even off to create the USB boot stick from an ISO file.


Refer to these links for more information:
Create an ISO image for Boot Camp from Windows https://support.apple.com/en-au/HT203909
How to install Windows on your Mac with Boot Camp https://support.apple.com/en-au/HT201468
Install Windows on Mac using a USB hard/flash drive https://support.apple.com/kb/PH25912
4. Run the Mac Applications\Utilities\Bootcamp utility to setup the new Windows partition and begin the install. Since you are migrating rather than installing Windows you can deselect the first option to download drivers.
| Icon for the Bootcamp utility found in \Applications\Utilities\ |
5. To speed up this process make sure you deselect the "download the latest Windows support software from Apple" option.

6. Be sure to select the NEW drive before proceeding to create the new BOOTCAMP partition.

UPDATE March 2018: New reasonably priced tool (~$20USD) from Paragon called CampTune that allows this although I have not tried it myself yet

IMPORTANT CONCEPT: The reason this step and the previous (recreating the recovery partition) are necessary is so that the Mac OS can manage the correct changes to the new physical disk. Which is responsible for managing two sets of hybrid GPT and MBR partition configurations. If you use other unaware disk utilities to do anything other than reading and writing to already existing partitions then this dual set of information becomes corrupted leading to one aspect not being able to boot properly. That is to say, you cannot (or definitely should not) use other partition management software to create, delete, or resize ANY partitions when a Bootcamp partition is installed. Not unless they specifically say they are Bootcamp aware like the paid Paragon and WinClone utilities (mentioned near the start of this article).
7. When Bootcamp reboots DO NOT run the Windows install on the DVD. Instead, hold down the option key (hold the Power button down for a long time to force off if necessary) and then boot into either the OLD or NEW Mac OSX partitions.
Links related to this process
If Bootcamp refuses to run you will have to have a cheap external DVD (or internal) with the Windows install DVD in it. Alternatively, you can use some other device that acts in this way such as an ISOSTICK (what I use) http://isostick.com/ - A smart USB memory stick like device. You put ISO files on it and tell it to load one of them as a DVD drive.
======================================
Background: Most Windows partition cloning tools utilise a pre-boot environment to do cloning of the operating system's drive. This is a limiting problem for most of the Windows free partition management tools in that they cannot usually successfully setup a partition cloning/copying process in Windows then reboot into the pre-boot Windows environment and then successfully work in the Mac Bootcamp environment. This is because of the mixed GPT/MBR disk arrangement that BootCamp uses on the disk drive. Therefore the Windows partition cloning tools fail with errors that suggest your disk configuration has changed. I now use the Mac OSX command line disk utility to do the cloning. Another way to address this cloning and the way I initially used to do this, is by booting to WinPE or Linux live CD tools like Clonezilla (see below for this alternative).
I now find the easiest way to clone the Windows partition is to boot into either the old or the new Mac OSX operating system and use the generic 'dd' command as follows:
1. First check out the disk device identities in the \Applications\Utilities\DiskUtility and identify the device ID for the old and new Windows partitions. Shown as Device: in centre bottom of following images. i.e. 'disk0s4' and 'disk1s3'


Note: You can also use a command line program to do this after step 2 below. The command to use is 'diskutil list'. But be careful you note the correct disk partitions.
2. Start the Terminal program. \Applications\Utilities\Terminal

3. Unmount the old Windows drive.
MacBook-Pro:~ roddines$ sudo umount /dev/disk0s4
4. Now initiate the command to duplicate the Windows disk fro the old to the new partition. WARNING: It is very important that you do not make a mistake here otherwise you could corrupt you good Windows partition. For this reason please make sure you have a backup or be very very careful.
MacBook-Pro:~ roddines$ sudo dd if=/dev/disk0s4 of=/dev/disk1s3 bs=128m conv=noerror,sync | pv | dd of=/dev/null
1952+1 records in 0 B/s] [<=> ]
1953+0 records out
262127222784 bytes transferred in 7156.076390 secs (36630020 bytes/sec)
0 B 1:59:16 [ 0 B/s] [<=> ]
MacBook-Pro:~ roddines$
5. You can also use a second terminal app to monitor the live progress of the 'dd' program.
MacBook-Pro:~ roddines$ watch -n5 'sudo kill -INFO $(pgrep ^dd)'
6. Once you have finished the 'dd' clone then you can mount the disk1s3 so you can check it worked successfully.
MacBook-Pro:~ roddines$ sudo mount /dev/disk1s3
7. You should then be able to use the System Preferences...\Startup Disk to select the new Windows partition to start to test it.
Proceed to next process E.
Alternative Approach: Booting to a Clonezilla Live USB/CD remains one of many alternative approaches to the Windows disk cloning procedure. But if you do use it be very careful to follow the relevant instructions in the link below:
Links related to this process
BootCamp Mac Disk Clone to a Larger HD
Qudos goes to Mark for this original blog guide that I used but for which I have made additions and improvements.
http://www.ourfunkyfamily.com/machinations/?p=8
1. Turn off the Mac and remove the old hard drive at this point. Simply so you cannot make any mistake and damage the original configuration and also because you are unlikely to need to access it again. That said, do not move any drives at this stage as if a problem arises you will possibly have to put it back to correct the problem.
2. Try to boot into the new Windows partition selecting it with the boot Option key pressed at startup.
If it does boot without a problem then you have succeeded and you have finished. You might like to make sure your Apple BootCamp drivers are up to date.
If you have problems then follow these further steps to fix your BCD boot configuration:
3. Get a Windows DVD install disk and DVD drive to boot into (similar to Procedure C, but) that matches the Windows OS version installed (cloned) onto the new Windows partition. You can download an ISO from here http://windowsiso.net/ or Microsoft, and you will need to burn it to a DVD if you don't already have one.
4. Use the Startup Option key to boot to the Windows install DVD.
5. At the dialogue screen where you select the input method. Type a Shift-F10 key combination and a command line session will appear.
https://asktheadmin.wordpress.com/2008/05/09/can-you-open-a-command-prompt-during-a-windows-install/
6. This command writes/fixes a Windows Vista/7/8/10 MBR to the system partition.

6. Be sure to select the NEW drive before proceeding to create the new BOOTCAMP partition.

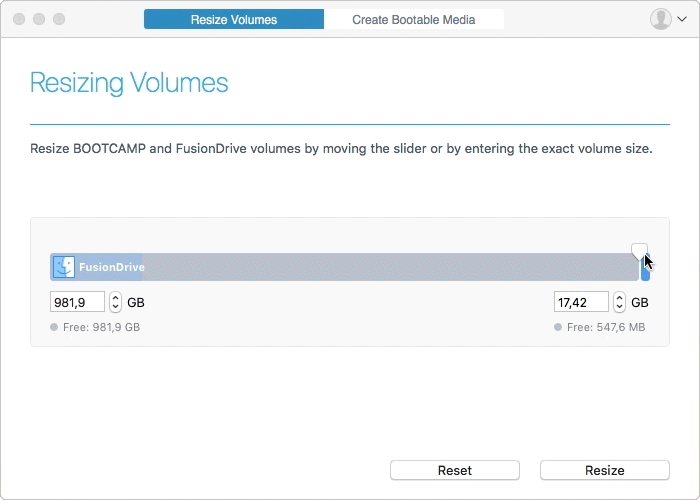
CRITICAL DECISION POINT: Be very careful in making your decision on the sizes of the Mac and Windows partitions. Because as far as I have determined so far there is no simple way to resize these partitions other than re-performing this entire process with the aid of another drive to migrate to (single process-replacement) and back from (a double process-acting as temporary storage).
UPDATE March 2018: New reasonably priced tool (~$20USD) from Paragon called CampTune that allows this although I have not tried it myself yet
Or try their fully featured Mac Hard Drive/Partition Manager utility for $40USD

IMPORTANT CONCEPT: The reason this step and the previous (recreating the recovery partition) are necessary is so that the Mac OS can manage the correct changes to the new physical disk. Which is responsible for managing two sets of hybrid GPT and MBR partition configurations. If you use other unaware disk utilities to do anything other than reading and writing to already existing partitions then this dual set of information becomes corrupted leading to one aspect not being able to boot properly. That is to say, you cannot (or definitely should not) use other partition management software to create, delete, or resize ANY partitions when a Bootcamp partition is installed. Not unless they specifically say they are Bootcamp aware like the paid Paragon and WinClone utilities (mentioned near the start of this article).
7. When Bootcamp reboots DO NOT run the Windows install on the DVD. Instead, hold down the option key (hold the Power button down for a long time to force off if necessary) and then boot into either the OLD or NEW Mac OSX partitions.
Links related to this process
If Bootcamp refuses to run you will have to have a cheap external DVD (or internal) with the Windows install DVD in it. Alternatively, you can use some other device that acts in this way such as an ISOSTICK (what I use) http://isostick.com/ - A smart USB memory stick like device. You put ISO files on it and tell it to load one of them as a DVD drive.
======================================
D. Clone the Old Windows OS to the newly created BOOTCAMP Windows partition.
Background: Most Windows partition cloning tools utilise a pre-boot environment to do cloning of the operating system's drive. This is a limiting problem for most of the Windows free partition management tools in that they cannot usually successfully setup a partition cloning/copying process in Windows then reboot into the pre-boot Windows environment and then successfully work in the Mac Bootcamp environment. This is because of the mixed GPT/MBR disk arrangement that BootCamp uses on the disk drive. Therefore the Windows partition cloning tools fail with errors that suggest your disk configuration has changed. I now use the Mac OSX command line disk utility to do the cloning. Another way to address this cloning and the way I initially used to do this, is by booting to WinPE or Linux live CD tools like Clonezilla (see below for this alternative).
I now find the easiest way to clone the Windows partition is to boot into either the old or the new Mac OSX operating system and use the generic 'dd' command as follows:
1. First check out the disk device identities in the \Applications\Utilities\DiskUtility and identify the device ID for the old and new Windows partitions. Shown as Device: in centre bottom of following images. i.e. 'disk0s4' and 'disk1s3'


Note: You can also use a command line program to do this after step 2 below. The command to use is 'diskutil list'. But be careful you note the correct disk partitions.
2. Start the Terminal program. \Applications\Utilities\Terminal
3. Unmount the old Windows drive.
MacBook-Pro:~ roddines$ sudo umount /dev/disk0s4
4. Now initiate the command to duplicate the Windows disk fro the old to the new partition. WARNING: It is very important that you do not make a mistake here otherwise you could corrupt you good Windows partition. For this reason please make sure you have a backup or be very very careful.
MacBook-Pro:~ roddines$ sudo dd if=/dev/disk0s4 of=/dev/disk1s3 bs=128m conv=noerror,sync | pv | dd of=/dev/null
1952+1 records in 0 B/s] [<=> ]
1953+0 records out
262127222784 bytes transferred in 7156.076390 secs (36630020 bytes/sec)
0 B 1:59:16 [ 0 B/s] [<=> ]
MacBook-Pro:~ roddines$
5. You can also use a second terminal app to monitor the live progress of the 'dd' program.
MacBook-Pro:~ roddines$ watch -n5 'sudo kill -INFO $(pgrep ^dd)'
6. Once you have finished the 'dd' clone then you can mount the disk1s3 so you can check it worked successfully.
MacBook-Pro:~ roddines$ sudo mount /dev/disk1s3
7. You should then be able to use the System Preferences...\Startup Disk to select the new Windows partition to start to test it.
Proceed to next process E.
Alternative Approach: Booting to a Clonezilla Live USB/CD remains one of many alternative approaches to the Windows disk cloning procedure. But if you do use it be very careful to follow the relevant instructions in the link below:
"Now restart the Mac from the Clonezilla CD, but this time take the defaults up through device-to-device and then choose partition-to-partition copy instead of HD-to-HD. Again be sure to choose the correct source and target partitions. You will be copying your source BootCamp partition to your new, target BootCamp partition. The only way to identify which of these partitions is which, will be by the disk they are on, their size and their file system type. When copying your source to target partition, be SURE to select the “–m” (Do not clone the bootloader) option and the –r (Resize the filesystem of the target to fit the partition size) and deselect the “–j2” (Clone the hidden data between MBR and 1st partition) option. This leaves (most of) the Windows/Mac boot stuff alone and only copies the data in the partition. This will take a while again (hours for me). (Mark's Machinations)
Also refer to this link for further info if you are game. http://clonezilla.org/clonezilla-live/doc/03_Disk_to_disk_clone/advanced/05-advanced-param.php
Links related to this process
BootCamp Mac Disk Clone to a Larger HD
Qudos goes to Mark for this original blog guide that I used but for which I have made additions and improvements.
http://www.ourfunkyfamily.com/machinations/?p=8
======================================
E. Fix the new copy of the Windows Partition so that it boots properly.
1. Turn off the Mac and remove the old hard drive at this point. Simply so you cannot make any mistake and damage the original configuration and also because you are unlikely to need to access it again. That said, do not move any drives at this stage as if a problem arises you will possibly have to put it back to correct the problem.
2. Try to boot into the new Windows partition selecting it with the boot Option key pressed at startup.
If it does boot without a problem then you have succeeded and you have finished. You might like to make sure your Apple BootCamp drivers are up to date.
If you have problems then follow these further steps to fix your BCD boot configuration:
3. Get a Windows DVD install disk and DVD drive to boot into (similar to Procedure C, but) that matches the Windows OS version installed (cloned) onto the new Windows partition. You can download an ISO from here http://windowsiso.net/ or Microsoft, and you will need to burn it to a DVD if you don't already have one.
4. Use the Startup Option key to boot to the Windows install DVD.
5. At the dialogue screen where you select the input method. Type a Shift-F10 key combination and a command line session will appear.
https://asktheadmin.wordpress.com/2008/05/09/can-you-open-a-command-prompt-during-a-windows-install/
6. This command writes/fixes a Windows Vista/7/8/10 MBR to the system partition.
- bootrec /fixmbr
It does not overwrite the existing partition table. Use this option when you must resolve MBR corruption issues, or when you have to remove non-standard code from the MBR.
7. Fix for the boot sector being damaged, overwritten or missing
- bootrec /fixboot
- bcdedit /export C:\BCD_Backup (backup old BCD settings)
- c:
- cd boot
- attrib bcd -s -h -r (remove system hidden and read only flags)
- ren c:\boot\bcd bcd.old (backup old BCD file)
- bootrec /RebuildBcd
If you get an error like this then go to the next step.
The boot configuration data store could not be opened.
The requested system device cannot be found.- c:
- cd boot
- del bcd
- bcdedit /create {bootmgr}
- bcdedit /set {bootmgr} device boot
- bcdedit /timeout 15
10. Reboot into the new Windows environment.
Links related to this process
Links related to this process
https://discussions.apple.com/thread/7184693?start=0&tstart=0
http://windowsitpro.com/systems-management/build-bootable-bcd-scratch-bcdedit
http://windowsitpro.com/systems-management/fix-unbootable-systems-bootsect
======================================
Windows does not show in Preferences - Startup Disk. If you have 3rd party NTFS drivers such as Paragon NTFS or Parallels these can cause a conflict issue. Refer: https://discussions.apple.com/thread/7472010?start=0&tstart=0
Slow or slower boot up after cloning HDD/SSD is often a problem with the boot process looking for the old HDD/SSD not finding it, then waiting for some timeout period, before moving onto the new Mac OS installing on the cloned drive. This can often be fixed simply by going into {Apple Logo Menu} - System Preferences - Startup (unlock at the bottom if necessary) and then explicitly selecting the newly cloned OS partition. If problems persist then refer here: http://hints.macworld.com/article.php?story=20090508092331291
I hope this helps others. Please post a comment if you found it useful or any errors or omissions need fixing.
http://windowsitpro.com/systems-management/build-bootable-bcd-scratch-bcdedit
http://windowsitpro.com/systems-management/fix-unbootable-systems-bootsect
======================================
Other Troubleshooting
Windows does not show in Preferences - Startup Disk. If you have 3rd party NTFS drivers such as Paragon NTFS or Parallels these can cause a conflict issue. Refer: https://discussions.apple.com/thread/7472010?start=0&tstart=0Slow or slower boot up after cloning HDD/SSD is often a problem with the boot process looking for the old HDD/SSD not finding it, then waiting for some timeout period, before moving onto the new Mac OS installing on the cloned drive. This can often be fixed simply by going into {Apple Logo Menu} - System Preferences - Startup (unlock at the bottom if necessary) and then explicitly selecting the newly cloned OS partition. If problems persist then refer here: http://hints.macworld.com/article.php?story=20090508092331291
I hope this helps others. Please post a comment if you found it useful or any errors or omissions need fixing.
Comments
I followed this and it worked. Now how to migrate to a larger SSD or HDD without all the pain.
Thanks for your post.
https://www.paragon-software.com/home/hdm-mac/features.html
Google Nederland Bellen
Great article! Choosing an Italy Dedicated Server is a smart move for businesses targeting European users, especially those needing low latency across Southern and Central Europe. The combination of strong connectivity, reliable infrastructure, and data privacy compliance makes Italy a solid hosting location.